Posts Tagged ‘best ice dam removal in minneapolis’
Tuesday, March 28th, 2017
How Does Eave Style and Construction Method Affect Ice Dam Formation and Severity?
Eave Construction and Heat Transfer
We have discussed the relationship between eave depth and ice dams previously (Case Study #10). Now let’s look into how different construction methodologies affect the likelihood and severity of ice dams in residential and light commercial construction.
For obvious reasons, eaves are a central topic in the world of ice dams. After all, that’s where 98% of ice dams occur, with the other slice of happening in areas including valleys, flat roofs and low pitch roof pans. There is a reason why older homes are affected more by ice dams then newer homes. That relates primarily to the nature of how the eaves are assembled.
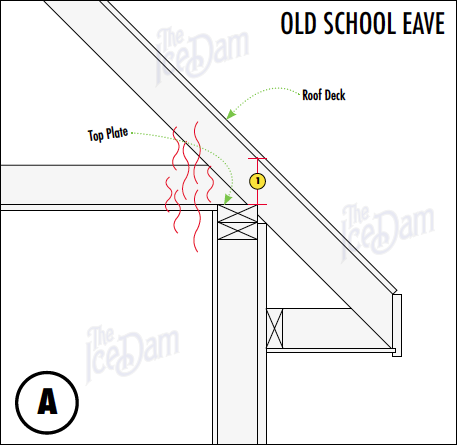
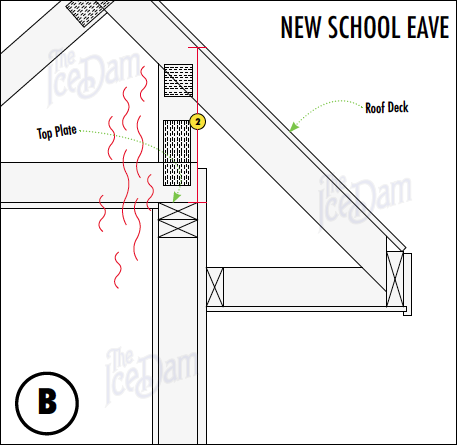
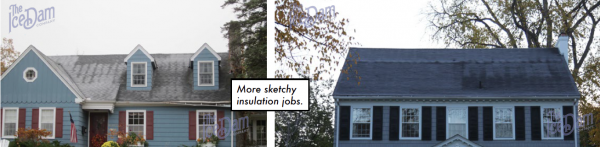
Our grandparents didn’t understand the importance of insulation and ventilation as it relates to the eave. (They were busy thinking about wars and famine). In short, there needs to be enough room between the top plate of the wall and the underside of the roof decking to allow for adequate insulation and ventilation. We know that ice dams are created in large part by the escape of heat from the interior, conditioned spaces of a home into areas where that heat is not supposed to be. Namely, it is not supposed to be in the roof cavity next to the roof deck. Homes with less insulation near the eaves are troubled with ice dams far more than those with adequate insulation and ventilation. In Diagram B, we see an example of common eave construction in modern homes. Notice that the distance between the top plate and the roof deck is quite generous. This is commonly referred to as the heel height. In Diagram A, which shows a hand-framed eave, there is virtually no space for insulation or ventilation. Consequently, heat can easily pass from the room below to the roof system, melting the snow above.
Don’t despair if you have old school eaves. There are options to help prevent or at least minimize the likelihood of ice dam problems in the future. Those can be broken down into two broad categories; Architectural and non-Architectural Solutions. In short, Architectural solutions involve modifications to the thermal performance of the home, including insulation, ventilation and, most importantly, sealing air-leaks into the attic or roof truss cavities. The most effective Non-Architectural solution is simple, cheap and effective. Install a high-quality, self-regulating heat tape system on affected areas.
Ask any experienced residential designer, classic architectural styles are difficult to execute with adequate heel heights. Talented designers can pull it off, but they need to think outside the box. High-end, architecturally refined homes don’t look right with clunky, new construction eaves.
To read more Case Studies click here.
Tags: about ice dams, best ice dam removal in minneapolis, best rated ice dam removal contractor, eave style and ice dam formation, eave style and ice dams, edina ice dam removal, heat tape and ice dams, heat tape ice dam prevention, highest rated ice dam removal company in minneapolis, ice and snow removal, ice dam expert, ice dam removal jerks, ice removal company, minneapolis ice dam removal, roof ice steaming, twin cities ice dam remover
Posted in Ice Dam Heat Tape, Ice Dam Prevention, Ice Dam Removal, Ice Dams, Misc., Ice Dams: General Info, Water Damage | Comments Off on Eave Construction and Ice Dams
Monday, February 20th, 2017
How to Tell if You Have Adequate Roof Ventilation in Your Soffits
Proper roof ventilation is an essential component of ice dam prevention. It is possible to get ice dams even when you have normal or even above average insulation in your attic. Passive heat loss will build up in your attic due to the stack effect (tendency for heat to rise). Therefore it’s important to let the attic breath so that warm air can be evacuated properly. Here is a quick way to check your attic for proper soffit, or eave ventilation:
Go up into your attic and look around in the dark. Here is what you should see:
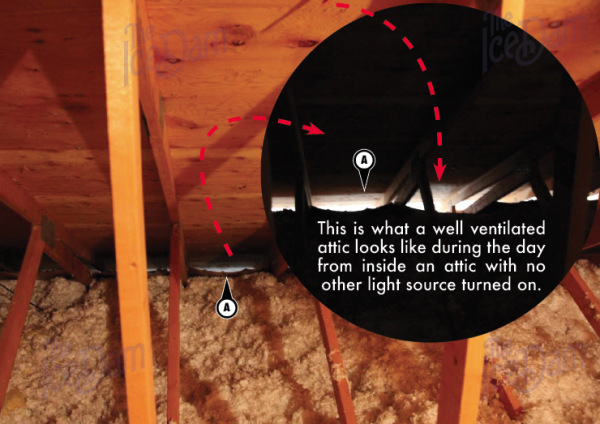
If you can see a lot of light through your eaves (A) you have half of your attic ventilation addressed. The other half is the ventilation up near the peak of the roof either in the form of box vents mounted to the roof deck or an open ridge vent along the majority of the ridge. It’s common to see the eave ventilation clogged with blown in insulation. Another common hindrance to proper eave ventilation is compressed or collapsed air chutes. This Eden Prairie home had problems with air-sealing and attic ventilation. We fixed the problems.
To read more Case Studies click here.
Tags: about ice dams, attic ventilation and ice dams, best ice dam removal in minneapolis, best rated ice dam removal contractor, eave ventilation and ice dams, highest rated ice dam removal company in minneapolis, ice removal professionals, identifying an ice dam, twin cities ice dam remover, ventilation and insulation and ice dams
Posted in Ice Dam Prevention, Ice Dams, Misc. | Comments Off on Preventing Ice Dams: Ventilation Part 1
Tuesday, February 7th, 2017
How to Prevent Ice Dams on Your Home – Answers from the Experts
Overview
To be frank, the entire concept of ice dam prevention is a little bit disingenuous. There are certain circumstances where even the most well constructed, well insulated and ventilated roof system will get ice dams. Those situations are rare, but they do occur. When we talk about ‘prevention’, what we are realistically discussing is the field of work aimed at either reducing the likelihood of ice dams or minimizing the impact of ice dams if they do occur.
Two Approaches to Ice Dam Prevention:
We break ice dam prevention into two broad categories; Architectural and Non-Architectural. Architectural solutions involve modifications to the existing structure to alter the problematic thermal characteristics that are contributing causes of ice dams. In contrast, Non-Architectural solutions are comprised of the work done to minimize the impact of unwanted roof and gutter ice accumulations when they are likely to begin.
Architectural Approach
It’s seldom the case that a single home medication, once implemented, will permanently fix an ice dam problem. More often than not ice dam prevention involves a combination of changes in order to have a significant impact.
A very standard ice dam prevention project for The Ice Dam Company might involve enhancing or replacing the insulation in the attic or roof system, adding ventilation and sealing all of the air-leaks between the heated spaces and the attic and roof framing. Usually, this combination of endeavors yields good results. Sometimes it is necessary to alter the roofing system itself. Normally, this means installing a single ply roof system such as hand-soldered copper pans or a rubber membrane. Single ply roof systems are quite resilient in the face of ice dams but they will to work in all areas due to aesthetics. We will dig further into each of the three basic architectural solutions in other Case Studies.
Certain ice dam creation factors cannot be addressed through Architectural solutions such as insulation, ventilation, air-sealing or roof system enhancements. Case Study #19 discusses the relationship between the sun and ice dams. We recently installed heat tape on a 6 year old, $3.8 million dollar home. The homeowner had spared no expense relative to energy efficiency in the original design and construction. That was not the issue. The problem was simply that the sun was melting the snow on an exposed roof plane higher on the home which resulted in melt water running down to a cold eave area that was hidden from the sun. There it would re-freeze in cycles to create an ice dam that kept coming back year after year.
Non-Architectural Approach
In terms of ice dam prevention, there is a small set of options available that fall outside of the Architectural solutions. These involve systems to manage snow and ice accumulations as they develop on a roof. The most popular Non-Architectural ice dam solution is heat cables. Otherwise known as heat tape and roof deicing, heat cables are wires that warm up in response to electrical current. Typically, heat cables are installed in a serpentine or zig-zag pattern on a roof along the eaves. To be clear, heat cables do not resolve the underlying issues related to why ice dams are happening rather they help manage the issue of unwanted ice accumulations when the conditions are ripe for their formation. A common complaint about heat tape is that it does not address the real issues causing the ice dams. This complaint is justified because it is true. That said, heat cable systems can be installed on a home for a fraction of the cost of traditional Architectural solutions. Many homeowners are not in the position to spend $5,000 to $25,000 for Architectural ice dam solutions making the idea of a $1,000 heat cable system very appealing. We do both approaches every day.
We would be remiss in not mentioning the very most basic thing you can do to minimize the likelihood of ice dams; Roof shoveling. Diligently removing the snow from your roof can greatly reduce the likelihood of ice dams. Unfortunately, some roofs are too high or have areas inaccessible to the average homeowner, making roof snow removal an ineffective approach to guaranteed ice dam prevention. Removing all of the snow from the roof planes affected by the ice dams is very important. See the Ice Dam Company Case Study #3 that discusses a phenomenon called the ‘Double Dam’.
To read more Case Studies click here.
Tags: about ice dams, best ice dam removal in minneapolis, best rated ice dam removal contractor, commercial ice removal, edina ice dam removal, heat tape and ice dams, heat tape ice dam prevention, highest rated ice dam removal company in minneapolis, ice removal company, minneapolis ice dam removal, orono ice dam removal, preventing ice dams, twin cities ice dam remover, wayzata ice dam removal
Posted in Ice Dam Heat Tape, Ice Dam Prevention, Ice Dam Removal, Ice Dams, Misc., Ice Dams: General Info | Comments Off on Ice Dam Prevention: Two Approaches
Friday, February 3rd, 2017
The Relationship Between Ice Dams and Icicles
Do Icicles Mean Ice Dams?
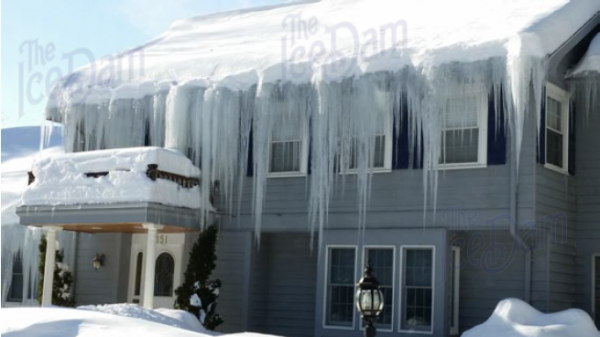
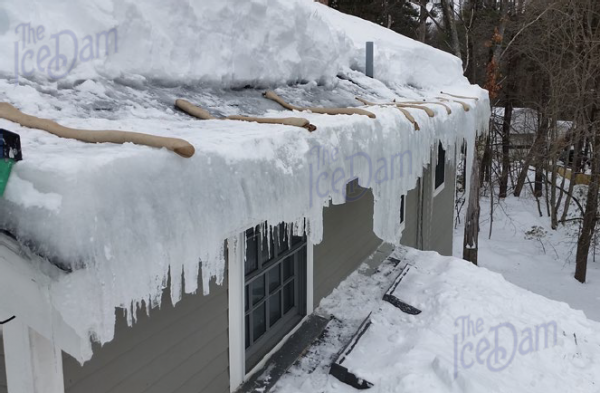
You may notice that the home shown below has some icicles (sarcasm intended). Obviously, when something like this occurs, it is quite likely that you have ice dams as well as a giant insurance claim from the subsequent water damage it has caused. The fact is, the vast majority of the ice dam steaming projects we complete are not on homes with monster icicles. When we arrive we often see quite modest icicles from the ground. The relationship between icicles and ice dams is not difficult to understand when you study the problem for awhile. This Case Study digs into the topic of icicles and ice dam life cycles.
Do icicles mean ice dams? The short answer is NO. While icicles on the edge of the roof are often a precursor to ice dams, they are not always present when ice dams begin to cause leaks through a roof system. Ice dams and icicles are part of the same accumulation but they are not the same thing by any means. This brings us to the normal life cycle of an ice dam.
The characteristics of ice dams change over time. The typical lifespan of an ice dam rangers from a few days to a few weeks. During that time it may get thicker or thinner, icicles may appear and disappear on its’ leading edge, and it may be almost completely hidden under snow or partially or completely exposed. For this reason, there is a big different between a young ice dam and an old ice dam in terms of the presence of icicles. Very young ice dams often have visible icicles on their leading edge. Over the following days most ice dams tend to grow more in depth than thickness, meaning the ice migrates higher up on the roof plane (refer to Case Study #06 for more information). Icicles on more mature ice dams tend to melt away from the affects of direct sunlight or warmer outdoor temperatures. However, while the telltale icicles may be missing, the mass of the ice dam is left behind, frequently hidden under a blanket of snow.
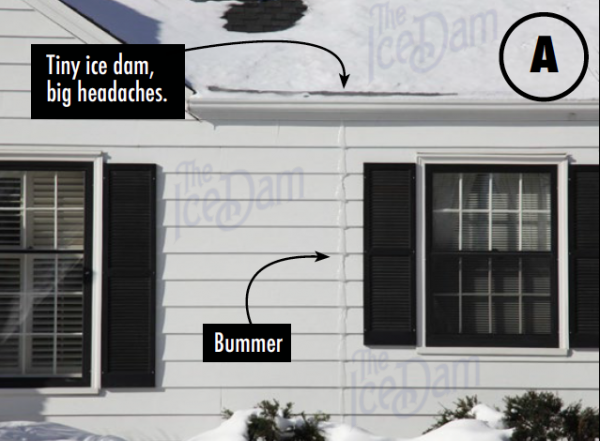
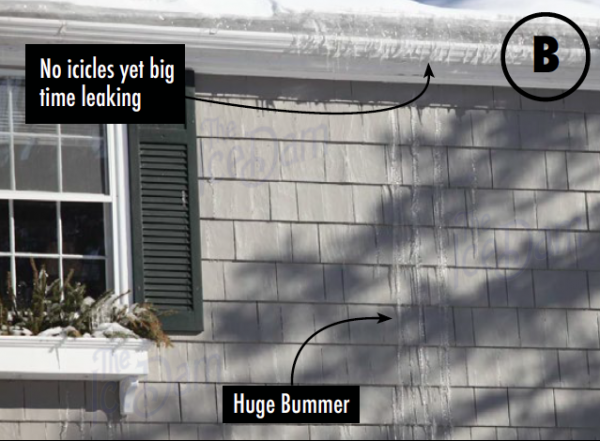
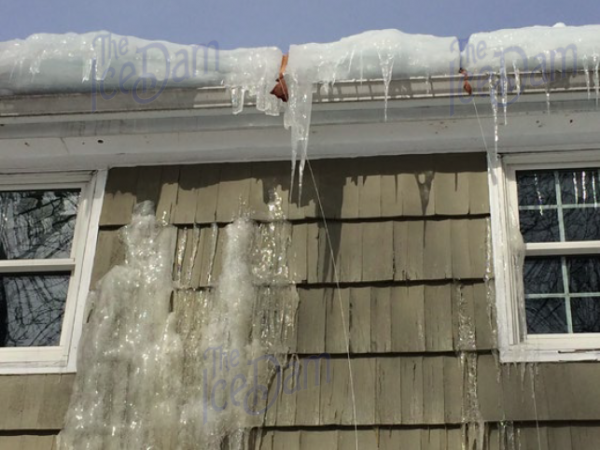
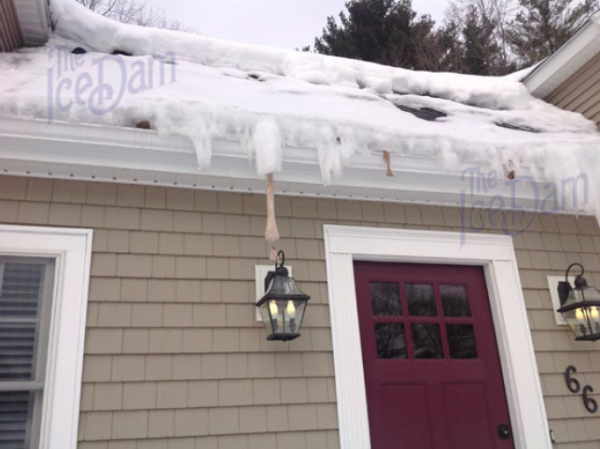
The photos above (A) and (B) demonstrate this phenomenon on two St. Louis Park homes. Virtually no traditional signs of an ice dam and yet you see water leaking down the exterior wall, through the siding and in the wall cavity itself. Bad news.
Case Study #16 examines the important topic of ice migration, from icicles to the interior of your home.
To read more Case Studies click here.
Tags: about ice dams, best ice dam removal in minneapolis, best rated ice dam removal contractor, edina ice dam removal, highest rated ice dam removal company in minneapolis, how do I know I have ice dams, how to file an insurance claim for an ice dam, ice and snow removal, ice dam expert, ice dam heat cable, Ice dam heat tape, ice dam prevention, Ice dam removal, ice dam removal jerks, minneapolis ice dam removal, twin cities ice dam remover, wayzata ice dam removal
Posted in Ice Dam Heat Tape, Ice Dam Prevention, Ice Dam Removal, Ice Dams, Misc., Ice Dams: General Info, Water Damage | Comments Off on Icicles and Ice Dams
Tuesday, December 20th, 2016
The Relationship Between Sunshine and Ice Dam Formation
Ice dams happen when there is a section of roof that is above freezing (32°) where roof snow melts which then drains to an area that is below freezing, usually the eaves, where it refreezes. The source of this temperature differential is usually the result of interior heat loss, specifically via air leaks and insulation issues. In fact, according to our experience, 95% of our client’s ice dam problems can be mitigated or eliminated altogether through the modification of the thermal characteristics of the home. Still, we see ice dams on certain homes for reasons outside the scope of it’s architectural deficiencies. Homes with what we might call nearly perfect air-sealing, insulation and ventilation still get ice dams. This Case Study describes such a situation.
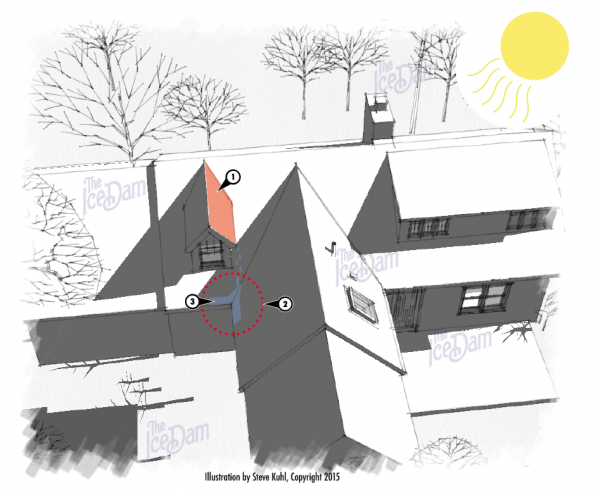
The winter sun hits Minnesota homes (and all homes in this latitude) at a low angle during the winter. The result is that certain roof slopes never see direct sunlight while others get hit quite directly. The above illustration demonstrates an ice dam situation that relates to the heating effects of the sun. Solar radiation warms the roof slope on the dormer (1), the resulting melt water drains to an area of the home (2) that never sees direct sunshine where it refreezes to form an ice dam (3). These are particularly challenging ice dams to prevent. Often times heat tape, also known as heat cables, are the only affordable option.
To read more Case Studies click here.
Tags: about ice dams, best ice dam removal in minneapolis, best rated ice dam removal contractor, edina ice dam removal, edina ice dam steaming, highest rated ice dam removal company in minneapolis, how do I know I have ice dams, ice and snow removal, ice dam expert, ice dam heat cable, Ice dam heat tape, ice dam prevention, ice dam removal jerks, minneapolis ice dam removal, sunshine and ice dams, thermal characteristics and ice dam prevention, thermal imaging and ice dam identification, thermal inspection, twin cities ice dam remover, wayzata ice dam removal
Posted in Ice Dam Prevention, Ice Dams, Misc., Ice Dams: General Info | Comments Off on Sun and Ice Dams: Cause and Effect
Thursday, December 15th, 2016
A Simple Explanation of Where the Water Goes When Ice Dams Cause Leaks
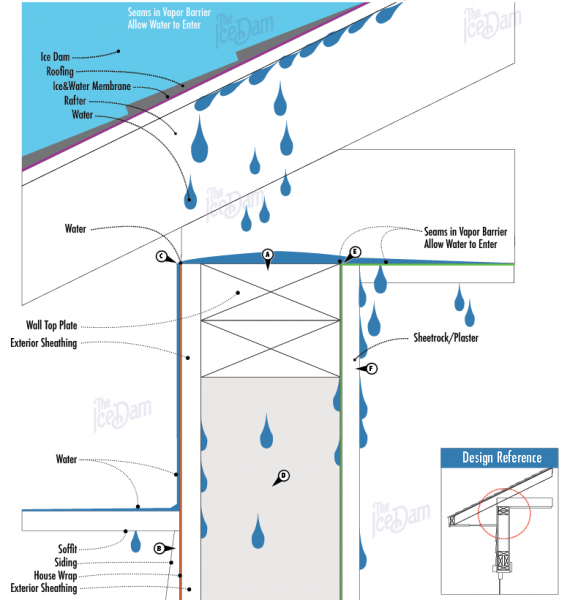
Where the Water Travels:
Water hitting the Top Plate of the wall (A) spreads out across the top plate, travels downward with gravity, working behind the Siding (B) the Housewrap (C), the Insulation (D), the Vapor Barrier (E) and the Drywall (F). Water always seeks the path of least resistance and therefore frequently shows up through existing penetrations in the ceiling such as lights. Water leaks caused by ice dams can travel many feet from the source before manifesting inside the home. On homes built with vapor barriers on top of the ceiling finish, water will sit on top of the drywall and soak the insulation before leaking inside.
To read more Case Studies click here.
Tags: about ice dams, best ice dam removal in minneapolis, best rated ice dam removal contractor, edina ice dam removal, edina ice dam steaming, heat tape, heat tape ice dam, heat tape ice dam prevention, highest rated ice dam removal company in minneapolis, how do I know I have ice dams, how to tell if an ice dam is a problem, ice and snow removal, ice dam heat cable, orono ice dam removal, twin cities ice dam remover, wayzata ice dam removal
Posted in Ice Dams, Misc., Ice Dams: General Info | Comments Off on Close Up of an Ice Dam Leak
Tuesday, December 13th, 2016
Ice Dams on Mansard Roofs Can be a Seriously Big Headache to Remove
Roof Styles Affect Ice Dam Severity
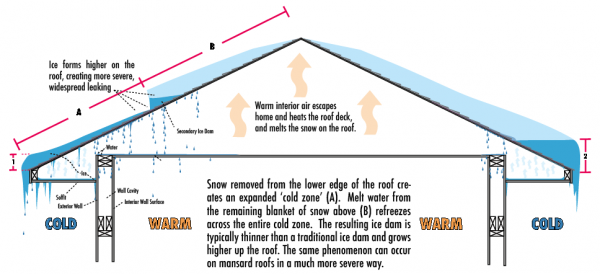
As discussed in Case Study #16, there can be some serious problems if homeowners decide to remove snow from only a portion of the roof plane affected by ice dams. We call it the ‘Double Dam’, which refers to the fact that ice dams can grow much further up the roof when only lower sections of snow are removed (commonly done with roof snow rakes because they can’t reach high enough on the roof).
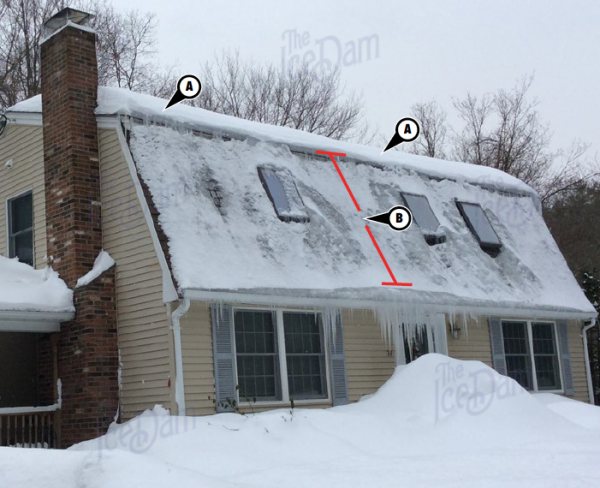
Mansard roofs, such as this one from Edina, Minnesota, can create massive ice dams when the steep pitch (B) is cleared of snow. This is amplified when the slope has directional bias towards the north because the sun will not help melt the ice as it accumulates. In the photo, below, we see two ice dam problems on this Edina mansard roof. The traditional location (A) is exacerbated by the low roof pitch (Case Study #09 explores the relationship between roof pitch, or roof slope, and ice dams). Area B has an ice dam that covers the entire span of the roof slope. This took many hours to remove even with our commercial ice dam steaming equipment.
Which Ice Dam Do You Want?
Ice dam #1 is not the one you want. Ice dams like this take hours to remove with steam, which is the most efficient and safe method for removing ice dams. This ice dam is thin but it has grown many feet up the roof. Ice dam #2 is an easier problem to resolve.
To read more Case Studies click here.
Tags: about ice dams, best ice dam removal in minneapolis, best rated ice dam removal contractor, edina ice dam removal, edina ice dam steaming, highest rated ice dam removal company in minneapolis, ice and snow removal, ice dam expert, ice dam heat cable, Ice dam heat tape, ice dam prevention, ice dam removal jerks, identifying an ice dam, is my ice dam bad, mansard roofs and ice dams, relationship between styles of roofs and ice dam formations, removing ice dams with steam, removing massive ice dams, roof ice steaming, roof pitch and ice dam relationship, roof styles and severity of ice dams, twin cities ice dam remover
Posted in Ice Dam Prevention, Ice Dam Removal, Ice Dams, Misc., Ice Dams: General Info | Comments Off on Mansard Roof Ice Dams
Monday, December 12th, 2016
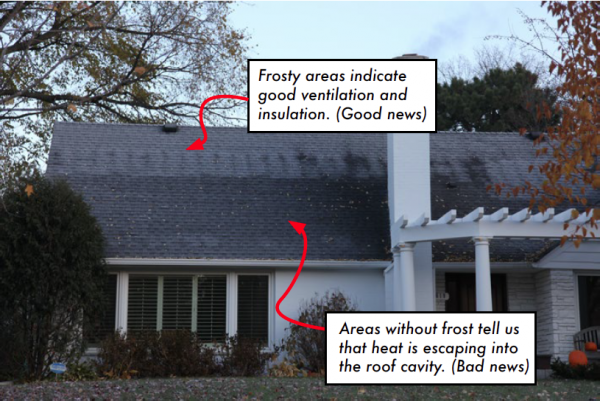
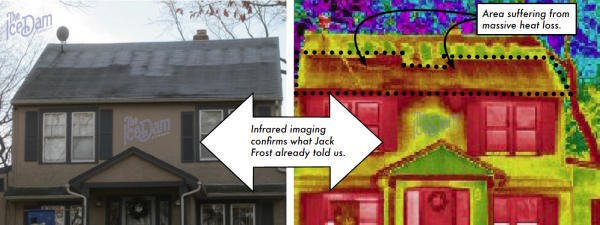
What Frost Melt Patterns Can Tell You About Your Home
Insulation and Ice Dams
At their most fundamental level, ice dams are the result of the interaction of heat loss and snow on your roof. An experienced Ice Dam Company Thermographer can use photos like these in conjunction with infrared imaging to see the weak points in your home’s thermal envelope. If you have a moment on the next frosty morning, take a few photos of your roof from a few angles before the sun hits it. Those photos may end up saving you time and money if you are hoping to fix the root cause of ice dams and home heating inefficiencies. Of course, ice dam prevention involves more than simple insulation job, but understanding the basics through frost pattern analysis, thermal imaging and a good site inspection is a great place to start.
To read more Case Studies click here.
Tags: about ice dams, best ice dam removal in minneapolis, best rated ice dam removal contractor, highest rated ice dam removal company in minneapolis, ice and snow removal, ice dam expert, ice dam removal jerks, minneapolis ice dam removal, thermal inspection, water damage
Posted in Ice Dam Prevention, Ice Dam Removal, Ice Dams, Misc., Ice Dams: General Info, Water Damage | Comments Off on Ice Dam Prevention: Go Thermal
Thursday, December 8th, 2016
Observations on the Effectiveness of Ice Melting Compounds on Ice Dams
Can Dad’s Old Pantyhose Save Your Home?
Over the past 25 years we have seen many different methods used to address ice dams. More often than not those measures are reactive, not proactive. Thus is the case of the lowly salt sock, otherwise known as a cloth tube of some sort filled with an ice melting compound of some sort.
Salt socks work on the principle that the ice melting compound is contained in a linear form which, when laid across an ice dam, will melt a channel through the ice. That path would then presumably be used as an escape route for water that may tend to get trapped behind the ice dam. The purpose of the sock is to hold the ice melting material in place, thereby concentrating the melting action. (Yes, that was a cross-dressing joke about dad).
Concept Vs. Reality
The only problem with the sale sock is that it simply doesn’t work. The examples below show typical results. In theory, salt socks seem like a great idea. In practice, however, using them to deal with an ice dam is not practical. One problem is that in order for them to do their intended job (Cut channels through the ice dam) they need to be placed somewhere meticulously, every 16″ or so. That’s a lot of socks. Next, we see that they tend to only melt about 90% down through the ice dam and then putter out. We have no idea why they don’t melt a clean slot right down to the roofing material but it never happens? The net result is that the melt water that causes ice dams, and the leaks that follow, still can not find a way off the roof. That’s bad. Perhaps the most dangerous part of using salt socks (outside of balancing on a ladder to position them all perfectly) is that they create a false sense of hope. Homeowners tend to ‘install’ them and not look back. That is, until water is dripping through the ceiling.
These salt socks didn’t melt down to the roof, resulting in massive water damage to the interior walls. (Can you find the ice on the siding?)
Sad and ineffective pantyhose, encased in ice.
Here’s the bottom line: Don’t use salt socks or pantyhose filled with ice melting compounds to manager your ice dam problem. It simply doesn’t work.
To read more Case Studies click here.
Tags: about ice dams, best ice dam removal in minneapolis, best rated ice dam removal contractor, highest rated ice dam removal company in minneapolis, ice and snow removal, ice dam expert, ice dam heat cable, ice dam removal jerks, ice dam removal with pantyhose, pantyhose and ice dams, right vs wrong way to remove ice dams, salt socks and ice dams, signs of an ice dam problem, twin cities ice dam remover
Posted in Ice Dam Prevention, Ice Dam Removal, Ice Dams, Misc., Water Damage | Comments Off on Salt Socks, Pantyhose and Ice Dams
Thursday, December 8th, 2016
How Roof Pitch (Roof Slope) Affects the Impact of Ice Dams on Standard Residential Construction
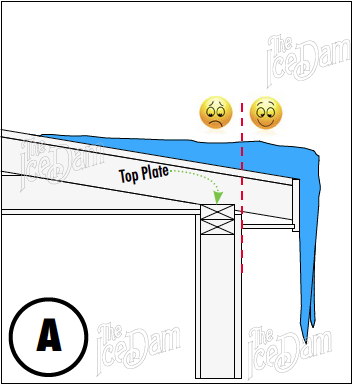
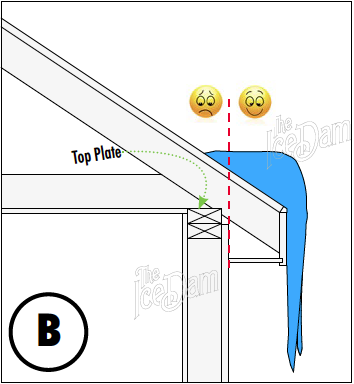
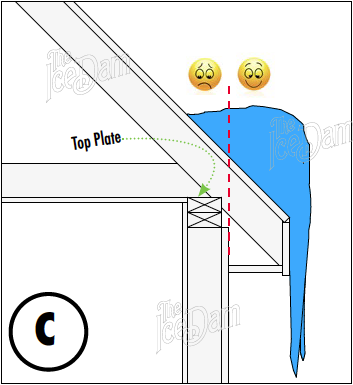
Fact: The Flatter the Roof, the Less Ice it Takes to Cause Problems
As discussed in previous Ice Dam Company blogs and Case Studies, there is a strong relationship between roof slope and the timing and likelihood of damage as the result of ice dams. Specifically, low roof slope areas are far more susceptible to damage by small ice accumulations than areas of steeper slope. Why? It comes down to basic geometry. Study the diagrams, below. You can see that the high slope roofs (C) require a pretty thick ice dam to form before water will begin leaking into the home. Eave depth plays another important role. See Case Study #10 for more information.
Ice dams create leaks when melted water from higher on the roof slope hits a dam of ice and is forced to travel backwards, up and under the plus of the roofing system (typically asphalt shingles). When that backward motion occurs outside the plane of exterior wall (dotted red lines in diagrams), the water runs down the exterior wall or through the soffits (zone indicated by happy face). As soon as the water falls on top of the top plate of the wall it seeps down through the wall causing damage to insulation, finishes and flooring (zone indicated by sad face). Truthfully, water coming through your soffits is nothing to be happy about. The next step is the interior of your home so it is considered an emergency in terms of the progression of the ice dam. As mentioned before, if you see ice coming through the soffit or down the exterior wall, it’s time to get that ice dam removed.
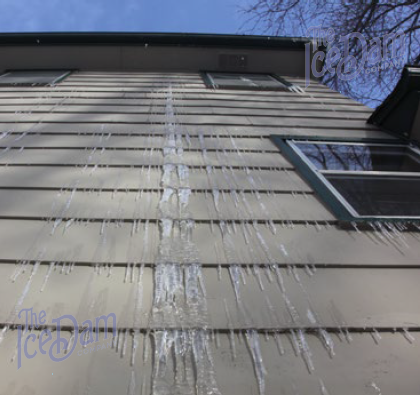
Wayzata Residence with Low Pitch Roof Suffers the Consequence
Seen below is a home in Wayzata, Minnesota where we steamed an ice dam a couple of years ago. The construction assembly was typical 2×6 walls, 12″ eaves, 6″ facia with a 2/12 roof pitch. From the ground, no ominous, threatening icicles could be seen, just a couple of pathetic whiskers of ice off the face of the gutter through the soffit (D). Pan out and you see that the entire exterior wall was bleeding ice through the siding. This is bad. This home had massive damage to the interior insulation, drywall and flooring systems.
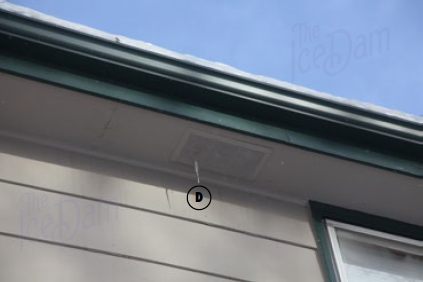
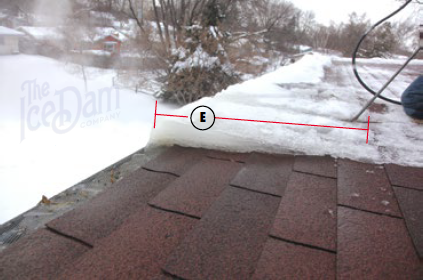
As discussed in Case Study #06, low pitch roofs also tend to create ‘deeper’ ice dams (E), where the ice has grown further up the roof. Deep ice dams take far longer to remove.
Three take-aways:
- No icicles does not mean no ice dams.
- Low pitch roofs present higher risks in terms of how quickly small ice dams can cause big problems.
- Ice or water coming down the exterior wall in below freezing conditions is bad. Very, very bad.
To read more Case Studies click here.
Tags: about ice dams, best ice dam removal in minneapolis, best rated ice dam removal contractor, commercial ice removal, edina ice dam removal, edina ice dam steaming, highest rated ice dam removal company in minneapolis, how do I know I have ice dams, ice and snow removal, ice dam expert, ice dam heat cable, ice dam prevention, ice dam removal jerks, twin cities ice dam remover, wayzata ice dam removal
Posted in Ice Dam Prevention, Ice Dam Removal, Ice Dams, Misc., Ice Dams: General Info, Water Damage | Comments Off on Roof Pitch and Ice Dams: Part 1


