How Much Should it Cost to Have an Ice Dam Removed: Ice Dam Steaming Costs Explained by The Ice Dam Company
Ice Dam Removal: Pricing Vs. Cost
As mentioned in Case Study #05, there is a big difference between price and cost when trying to figure out how much your ice dam removal project will cost. The price is what someone tells you over the phone, normally relating to what they charge per hour for their ice dam removal services. We made a list of the 8 most common factors in determining the cost of ice dam removal in Case Study #05. Here is an examination of one major driver in ice dam removal cost: The depth of the ice dam.
Which takes longer to remove?
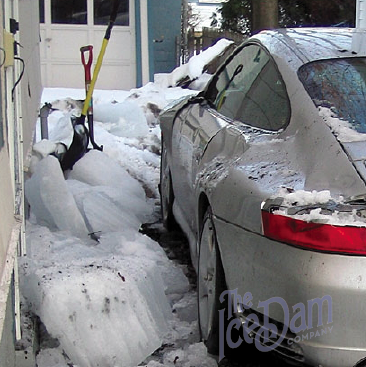
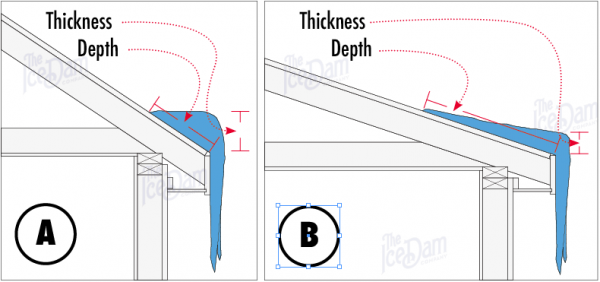
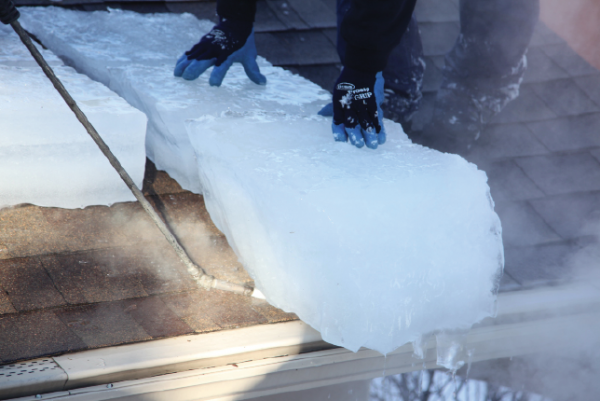
Intuition might suggest that thicker ice dams (A) take longer to remove then thinner ice dams (B). Not true. The main factor in the ice dam removal cost is how far up the roof the ice has grown. We refer to this as the ‘depth’ of the ice dam. Deeper ice dams take much longer to remove than those that are thick but shallow.
Estimating the Cost of Ice Dam Removal by Steam
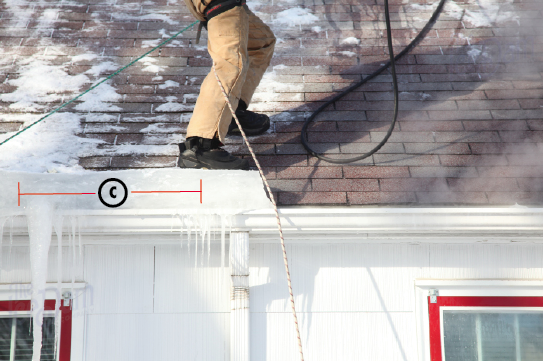
You might think that after having removed thousands of ice dams around the country over the past 25 years we would be able to provide an accurate estimate over the phone as to how long a project might take. Sadly, we can’t. Anyone offering a guaranteed timeframe for ice dam removal projects over the phone is frankly full of it. We know that we can often remove between 10-15 feet of ice dam as measured along an eave every hour after the equipment is set up (C), below left. We know that there are many factors that determine the ultimate length of the ice dam steaming time, as discussed in Case Study #05. One of the main project timeframe drivers is ice dam depth and it can not be known until an experienced eye sees it and that can’t be known until the snow has been removed from the area. Until the ice dam is fully exposed it is impossible to know how long it will take to remove it. In the photos below, the ice dam on the right took three times longer to steam off than the ice dam on the left, even though it was 1/3 the thickness and the roof was a ‘walker’. It’s all about how far up the roof the ice has grown.
How to Figure Out if the Leak is from Ice Dams or from Something Else?
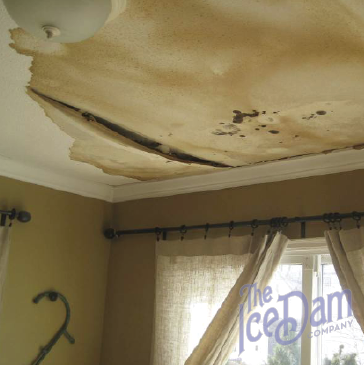
As discussed in Ice Dam Company Case Study #03, ice dams can form in many locations on the typical home. The eave (lowest edge of the roof) is the most common area for ice dams but we find them around other areas including skylights, in valleys and in low-pitch roof pans and saddles. Many times a winter we get calls from concerned property owners who are experiencing leaks – or at least that is what appears to be happening – because they see water, moisture or discoloration on the ceiling. It’s logical, after all, to assume the roof is leaking when one sees that sort of thing. But the fact of the matter is that winter roof leaks can be attributed to a few potential sources. Here are a few of the common sources:
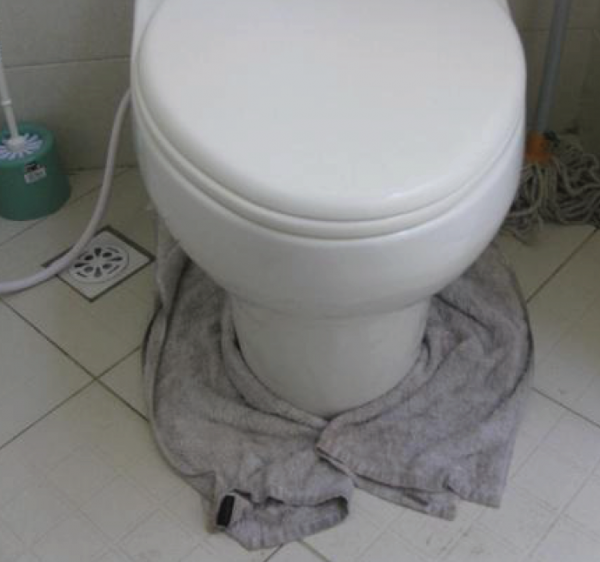
Plumbing Leaks
Is the leak in close proximity to a plumbing fixture, water supply or drain line? The most common sources of plumbing related leaks in homes are associated with failing shower pans, over-flowed bathtubs and faulty caulking or bad wax rings around toilets. Water can travel many feet from the source before it finds the path of least resistance and shows up. It’s typical to see water coming through penetrations through the ceiling such as recessed lights and at sheetrock seams many feet from the leak source. Plumbing failures can occur at any time during the year. When they happen in the winter, homeowners often assume its an ice dam. Plumbing leaks can be tricky to find and fix. Our favorite tool to find this type of leak is the thermal imager. This is a special camera that sees through walls and ceilings to detect differences in temperatures.
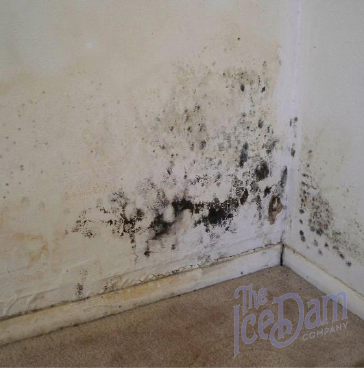
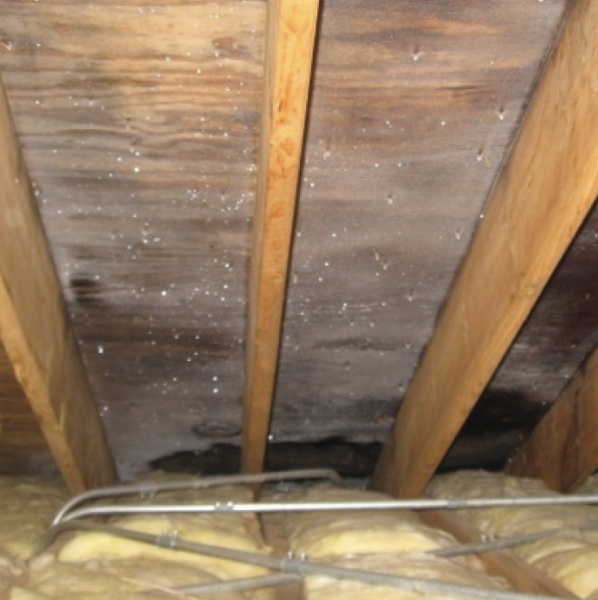
Attic Frost and Attic Condensation
If possible, it can be tremendously helpful to peak into the attic. A healthy attic with good ventilation (Ice Dam Company Case Study #17) should not present moisture or frost on the framing members or roof decking. The photo, right, shows a poorly insulated, ventilated and air-sealed attic. Notice the frost on the underside of the roof decking? This is not good. Attic frost can cause tremendous damage and is most likely to accumulate when temps are quite low (below 10°F). Warm, moist air meets the ice-cold roof deck and freezes into frost. This cycle continues until as much as 1/8″ and 1/2″ of frost has built up. When outdoor temps rise above freezing, all of that frost melts and has nowhere else to go by the interior of the house. This type of ‘leak’ is tricky because it is actually not a leak. We have seen clients spend thousands of dollars trying to resolve a roof leak that was in fact nothing more than attic condensation. Future Ice Dam Company Case Studies will discuss how we fix this issue.
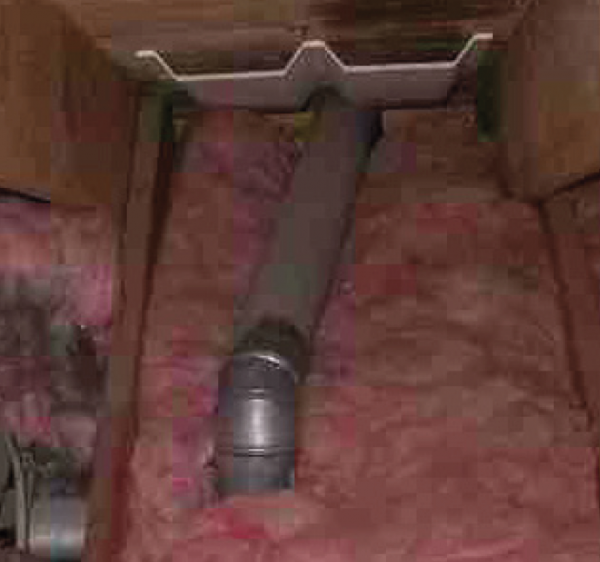
Exhaust Vent Condensation
This is a very popular source of the winter roof ‘leak’ phone call we receive. Similar to attic frost-related leaks, this problem is related to the accumulation of frost inside an exhaust vent, commonly a bath vent duct where it travels through an unheated attic. A quick review of the temperature variations from the previous week is a good clue that we may be dealing with an exhaust vent condensation issue. If we had a number of days with extreme cold (highs in the single digits) followed by a thaw (highs in the mid-high 30’s) our first guess without even visiting the home is that the source of the moisture is a condensation issue, not a roof leak. Of course, a thorough site inspection is essential in confirming our suspicions. In almost all cases when exhaust vents are the culprit the leak shows up in the bathroom. Future Ice Dam Company Case Studies will discuss how we fix this issue.
Last but Not Least…Ice Dams
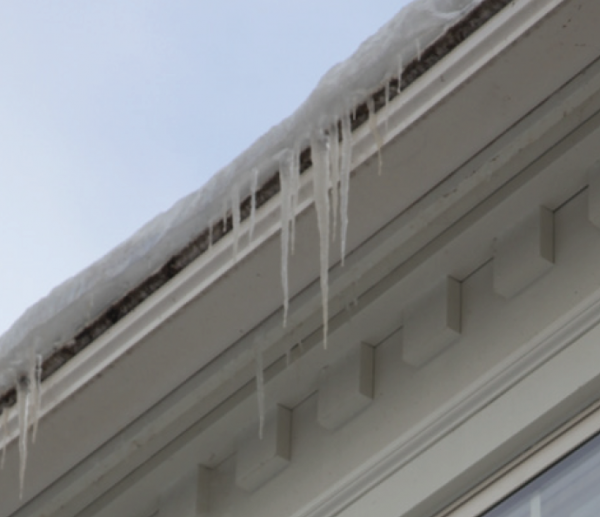
Do you see icicles on the eave near the leaking area? Do you see an ice dam? While not always the case, ice dam causing leaks are usually plainly visible from the ground (See Ice Dam Company Case Study #20). The steeper your roof pitch, the more ice it takes to create interior leaking (See Ice Dam Case Study #09). If you have a low-slope roof area, accumulations as little as 1″ thick can cause problems. Likewise, a heavy blanket of snow can hide the significance of an ice dam, making it hard to ascertain it’s size. Ice Dam Company Case Study #01 and #02 describe some easy things to look for in determining if you have an existing ice dam issue. In our experience, it is unusual to get roof leaks cause by ice dams when no appreciable ice accumulations can be seen from the ground. It can happen, however. It is common to see water/ice coming through the soffit or down the exterior wall when ice dams have developed to the point where they are forcing water to back up into the roofing system.
We have spent a lot of time discussing the finer points about ice dams over the years. This Case Study is about pulling the focus back to the most global understanding of why ice dams happen.
What Causes Ice Dams
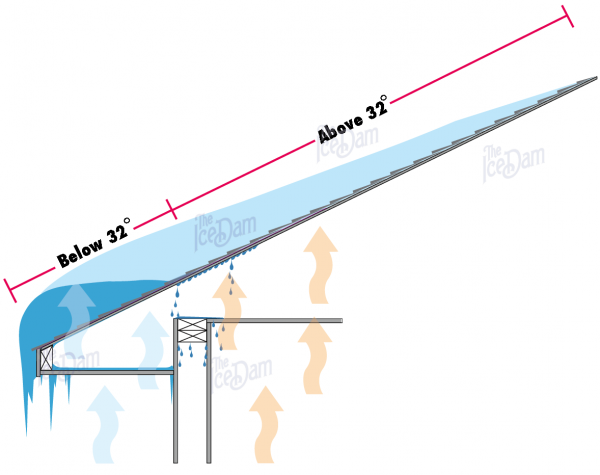
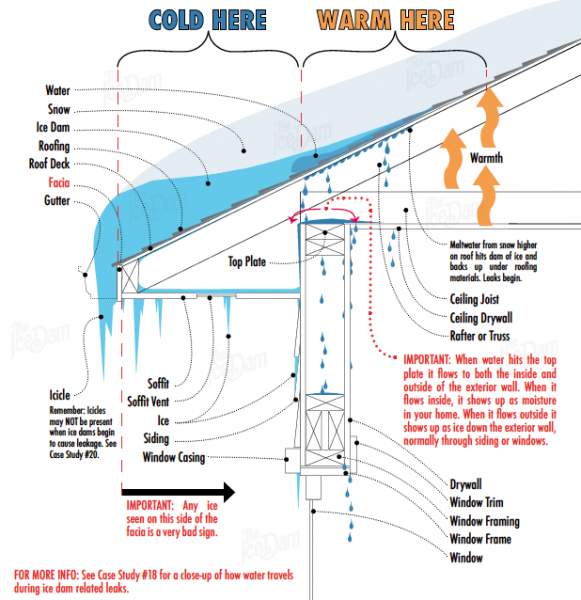
There are over a dozen factors that contribute to the formation of ice dams, all of which have been discussed in previous Case Studies. Fundamentally, only one condition MUST be met in order for ice dams to form: A temperature differential from one area of a roof assembly to another area, with the upper area being above 32° and the lower area being below 32°. See below.
How it Works
This diagram demonstrates the basic concept behind ice dam formation. Snow melts in the area above 32°, water runs down to the area below 32° and refreezes. This cycle continues until an accumulation of ice forms that is large enough to block water from flowing naturally off the roof. The resulting ‘ice dam’ forces water to back up under the roofing materials and into the structure. There are many intersecting variables that cause the phenomenon described here. See below.
List of 7 Contributing Factors to Ice Dam Formation
A period of outdoor temperatures ranging between 0°-10° at night followed by daytime temperatures between 10°-20°.
Repeated snow falls that keep the roof loaded with new snow resulting in at least 6″ of coverage at all times.
Thermal inefficiencies in the home that allow warmth to heat up the roof deck from the underside.
Homeowner lifestyle that results in excessively heated spaces (More heat equals more roof snow melting).
Roof pitch: Flatter roof pitches tend to be more affected by problematic ice dams.
Eave depth: Smaller eaves tend to be more affected by problematic ice dams than deeper eaves.
Age and construction style of home: Older homes tend to be more affected than newer homes.
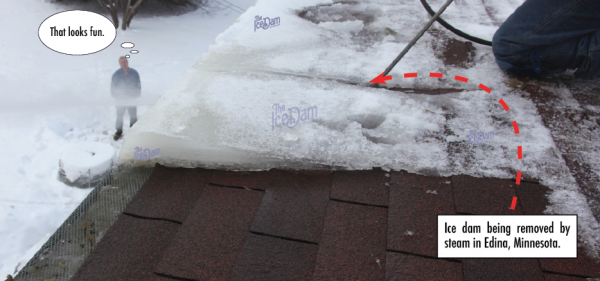
Steaming Ice Dams is the Fastest, Safest Way to Remove Ice Dams in Minneapolis
Why Use Steam?
When used properly, a commercial ice dam steamer is the best way to quickly and safely remove an ice dam or other unwanted ice accumulation. Like anything else, it’s possible to use a steamer improperly and damage property. That’s why you should hire an experienced ice removal company. Far more common is damage done to roofs using high temperature pressure washers. Most of our competitors that claim to be using steam are actually using high temp pressure washers. It’s the dirty little secret in our industry. Want to know the easiest way to tell the difference between a steamer and a high temperature pressure washer? If the gun has a trigger, it is NOT a steamer. It’s that simple. More information about Ice Dam Steamers vs High Temp Pressure Washers can be found here.
There is a lot of misinformation out there on the topic of ice dams. Our goal here is to be the single definitive source for all things relating to ice dams. Towards that end, here are some common misconceptions about ice dams, roof snow, roof ice and gutter ice removal.
FACT: Ice dams can occur with virtually no snow on your roof. It’s a question of ice accumulations. It takes very little actual moisture to form ice dams. Even a dusting of snow can create a problem. Of course it is most often the case the thick snow accumulations create ice dams more quickly, but don’t be fooled into complacency because it’s a low snow season. See Case Study #09.
FICTION: Gutters have something to do with ice dams. The truth is gutters have nothing whatsoever to do with ice dams. See Case Study #03 for proof. If your home is prone to ice dams you will get them regardless of whether or not you have gutters. If you have gutters they will fill with ice and provide a foundation for the ice dam above. True. If you don’t have gutters, the ice dam simply builds on the cold edge of the roof. We provide ice dam removal for many homes each year that do not have gutters. In fact, some of our repeat clients have removed their gutters upon the advice of a dumb person only to be shocked that the ice dams came back the season after. Whoops.
FACT: Gutter systems can be damaged by ice. We see it every year. A section of otherwise fine gutter is either on the ground or hanging pathetically off the edge of the roof, filled with ice. Ice weighs about 60 pounds per cubic foot and gutters are not designed to tolerate that sort of load. It’s important to initiate gutter ice removal sooner than later for this reason. See Case Study #11 for common ice dam damage.
FICTION: When it comes to insulation, the more the better. Improperly insulated homes are just as bad as under insulated homes when it comes to ice dams. We have fixed countless bad insulation jobs for this reason. Specifically, we frequently find insulation done in such a way as to inhibit proper ventilation. Moreover, if you don’t address air leakage into the attic or rafter spaces, all the insulation in the world won’t prevent ice dams. See Case Study #04 for details about good eave ventilation.
FACT: You can’t always see ice dams from the ground. It’s true that you can often spot a monster ice dam quite quickly. It’s easy to spot the two foot icicles and the little adjoining glacier on your gutter. The sneaky ones are usually above skylights or in roof pan areas far out of sight. Sometimes ice dams grow up valleys and on top of dormers making it almost impossible to identify from the ground. See Case Study #02 for more information on where ice dams form on residential homes.
FICTION: Salt socks are a smart way to address ice dams. People use pantyhose, old socks and store-bought cloth tubes filled with a variety of ice-melting compounds for removing ice dams. Corrosive substances like rock salt, sodium chloride, calcium chloride, magnesium chloride and more to melt channels through their ice dams. Some compounds are better than others, but all present risks you should keep in mind. Some of the aforementioned chemicals affect the integrity or color of your roof, some are corrosive to the aluminum when gutter ice is removed this way, some are corrosive to valley metal and other flashings, some damage plant life as the water drains below. You are rolling the dice when you go this route so be aware. See Case Study #13 for more information on salt socks (salt in pantyhose).
FACT: Ice should be removed by steam. Here is the skinny. We are roofers and have fixed hundreds of roofs that have been damaged by well-intentioned professionals with hammers, picks and hatchets in their pursuit of removing ice dams to help their clients. The damage we have found caused by the less-than-professional souls is almost funny if it wasn’t so serious. In our years we have seen jobs with picks and hammers where removing ice dams was done successfully. It get’s down to the question of whether you want to take that risk? We strongly advise against the hack-a-teer approach even if it is a little cheaper. Roof Ice and Gutter Ice should always be removed with steam.
FICTION: Ice dams need to be thick to cause a problem. Ice dams as thin as one inch can cause big problems. A good general rule is that the steeper your roof, the thicker the ice dam has to be to cause problems. On lower pitched roofs even a thin ice dam can hurt.
FACT: The leaking caused by ice dams may not show up right away. It would be nice if water stains or mold manifested immediately upon entering your home but it simply does not work that way. Often the water that ice dams push into homes travels around wall and ceiling cavities, trapped by vapor barriers and other materials until it finds the path of least resistance to escape. By the time you see water inside, it’s usually been there for a while, which results in mold and mildew.
The Factors that Determine Ice Dam Removal Cost and Pricing
Ice Dam Removal Pricing
Generally speaking, you can expect to pay somewhere between $300 to $600 per hour for ice dam removal with steam. As much as you may not want to hear this, with over 25 years of experience behind us, we can tell you that the primary driver for ice dam pricing is classic supply and demand. Every market will have a different demand for ice dam removal and a different supply of qualified contractors to perform that work. (See Econ101 from your freshman year for further details). Back to the word “qualified”. There are dozens of companies in the Twin Cities market right now who are using ice picks and hammers and axes to remove ice dams. They normally charge less per hour than ice dam steaming contractors. There are also scores of competitors using high temperature pressure washers and calling them steamers (hint: 2 of the top 3 Google results in Minnesota). Yikes. In the Minneapolis market we profit by following the work of the aforementioned “professionals” by repairing the damage they’ve done each winter with pics and pressure washers. It’s hurts to pay for ice dam removal. It’s extra painful to pay for repairing the damage left behind by losers.
Ice Dam Removal Speed
There are many factors that go into determining how long an ice dam takes to remove:
Roof height (Higher = More difficult)
Roof pitch (Steeper = More difficult)
Snow load (More snow = More time)
Site protections time (Property under the work area needs to be protected to prevent damage from falling ice and snow)
Ice dam thickness (Thicker = More time)
Ice dam depth (The further it has grown up the roof, the longer removal takes)
Outdoor temps (Colder = More difficult)
Ethics (Lower ethics = More time spent)
Having two members to the crew is not only important to safety, it is essential for efficiency. One guy cuts and one guy throws the ice chunks.
To Chunk or Not to Chunk
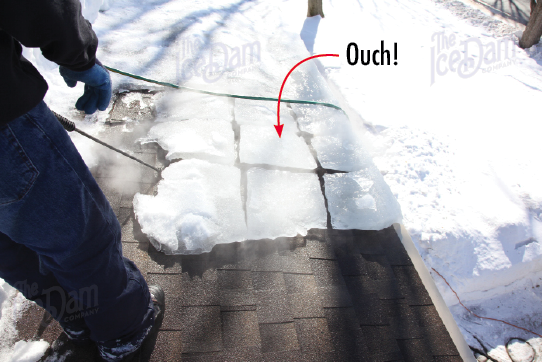
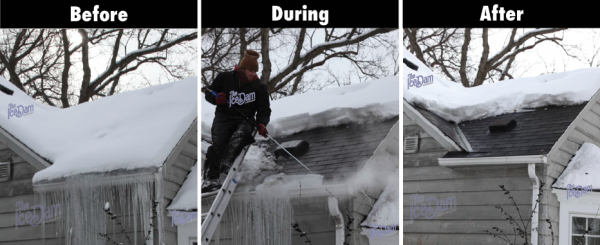
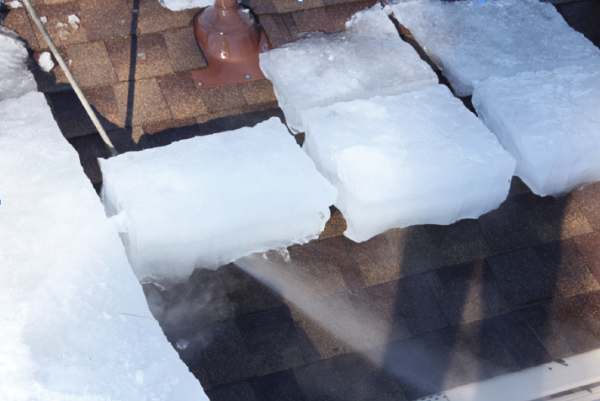
There is a big difference between ice dam removal COST and ice dam removal PRICING. Pricing is what one typically pays per hour for the work to be performed. Cost relates to how long it takes to do the job. In our list of the 8 factors that determine ice dam removal cost, #8 is the most important. That’s what the photos in this case study are meant to illustrate. Ethical ice dam removal guys do it like shown and they use steam, not high temperature pressure washers. It’s called ‘chunking’. The idea is simple. Use the steamer to cut the ice dam into chunks that can be picked up and thrown off the roof. Cutting ice is the part of the job that takes the longest. Add to cutting time, add to the job cost. The alternative is to use the steamer-or pressure washer if you’re totally smarmy-to methodically melt away ALL of the ice from the roof, one square inch at a time. As shown here, one only needs to actually melt about 5-10% of the ice in order to remove the ice dam. Make slots and undercut. It’s that simple. What the less ethical players do is also simple. Melt all of the ice, milk the clock and watch the dollars add up.
Where Do Ice Dams Normally Happen on Homes? A List of the Most Common Ice Dam Locations
Where ice dams happen…and don’t happen:
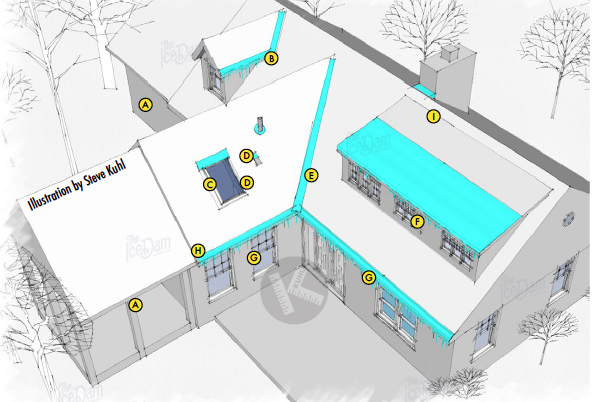
Ice dams seldom occur over unheated areas such as garages and porches (A).
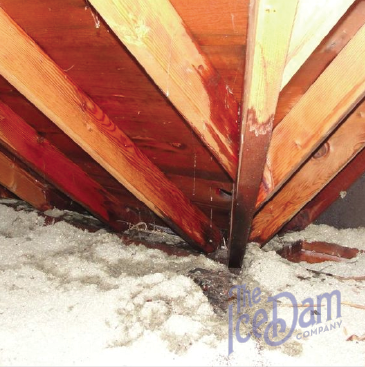
The valley areas of dormers frequently get ice dams (B).
Ice dams often occur both below and above skylights. Ice dams above skylights are hard to see from the ground, making them some of the sneakiest to discover (C).
Any openings through the roof – such as pipes and vents – are a good place for small ice dams for form (D).
Valleys are very common areas for ice dam formation. It is important to never use hammers or chisels near valleys as the difference between a thorough ice removal job and valley damage is fractions of an inch (E).
On roofs with a low pitch (angle) even a 1-2″ ice dam can cause significant leaking and interior damage (F).
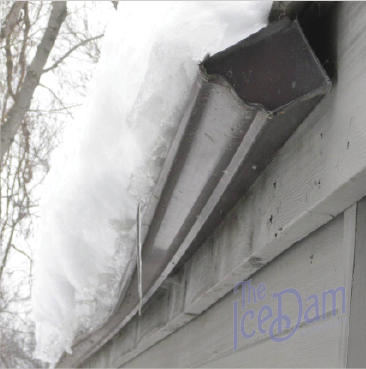
The eaves edge is the most common place to see ice dams. 80% of the dams we remove are found here (G).
Interior rooms with vaulted ceilings are frequently associated with large ice dams. Bathrooms are often the worst. If you had recessed lighting to a vaulted ceiling, you are much more likely to have ice dams (H).
Ice dams occasionally form around chimneys and furnace flues. Any place heat escapes through the roof line. Ice dams in these locations can be very, very small and still cause leaking (I).
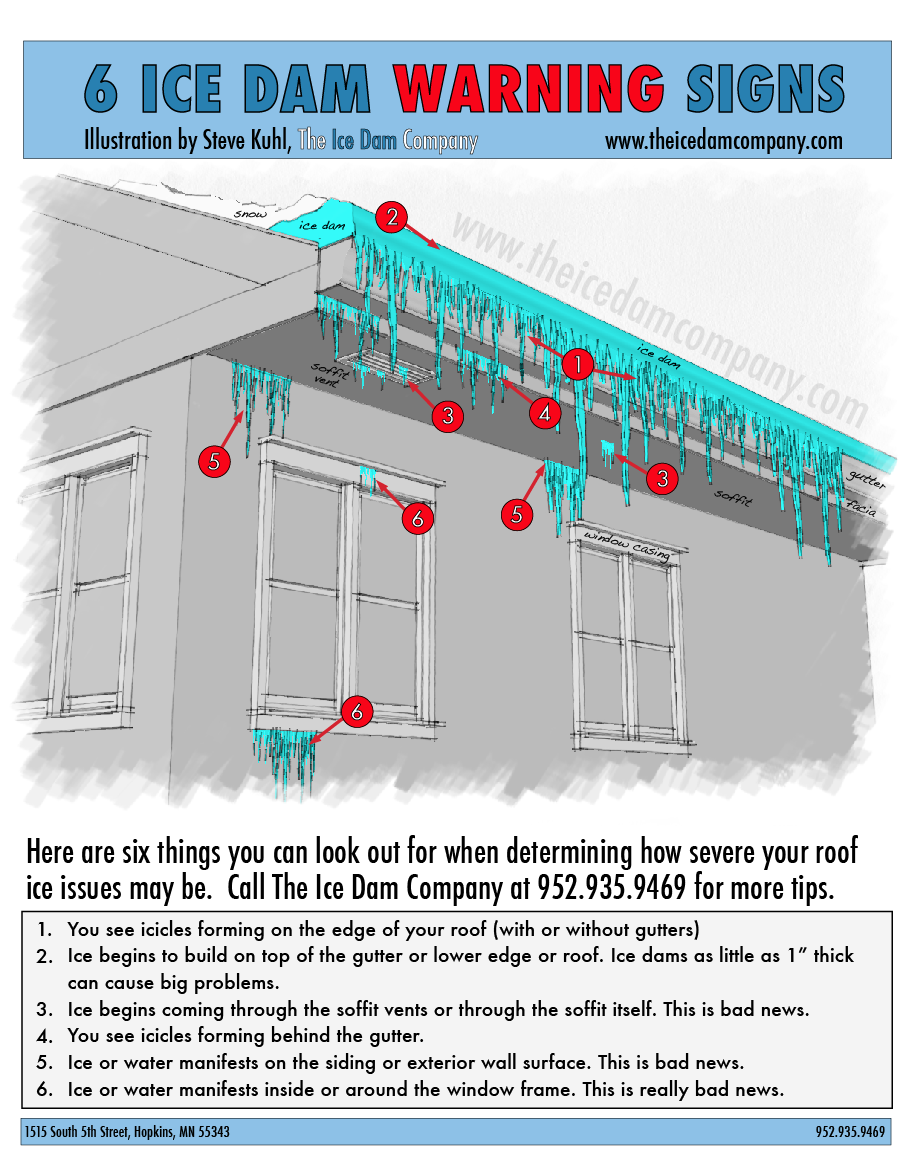
How to Know if You Have an Ice Dam Problem or Just Some Pretty Icicles
Here are six things you can look out for when determining how severe your roof ice dam issues may be:
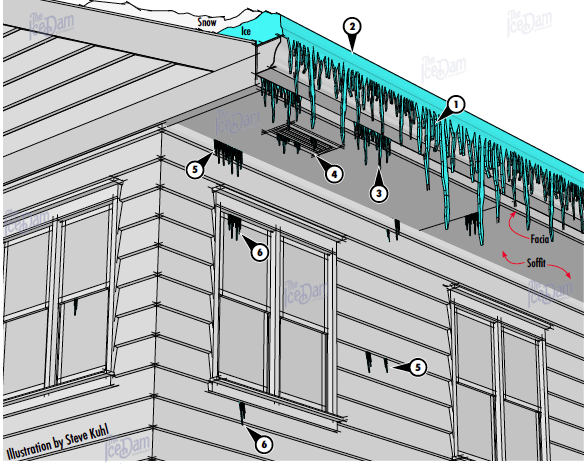
Icicles forming on the edge of your roof (with or without gutters).
Ice begins to build on top of the gutter or lower edge of roof. Remember: Ice dams as little as 1″ thick can cause big problems on certain roods. Don’t be fooled by small ice dams.
Icicles forming behind the gutter, or worse, behind the facia.
Ice begins coming through the soffits, normally through vents or through seams in the soffit. This is bad news. Next stop, your ceilings.
Ice or water shows up on the siding or exterior wall surface. Ice can appear in the anywhere along the wall, even randomly in the middle.
Ice or water shows up inside your home or around the window frame (interior or exterior). This is really bad news.
Call The Ice Dam Company at 952.935.9469 for help with your ice dams today.
Removing Ice Dams in Minnesota: We Serve Many Areas in the Minneapolis Metro
The Ice Dam company based out of Hopkins, Minnesota, about 5 miles west of Minneapolis. We've done gutter ice removal, roof ice removal and ice dam removal all over the Twin Cities, on new houses and old ones.
Some of the more frequent places we've done ice dam services are:


